I've wanted to do a makeup based on a Día de los Muertos, Sugar Skull for a really long time, but there are so many people who have done them that I thought if I was to do one, it would have to be something different and something Unique.
And then finally I came up with something that is :)
I first fell in love with Sugar Skull, hmm lets see... about 4 or 5 years ago I'd say. I was part of a belly dancing makeup tribe on Tribe.net - and somebody posted a picture of a Silva Ji painting.
I had never seen anything like it before, and instantly fell in love with it.
The person who posted it was asking if anyone had any advice on how to do it in makeup. And I was determined to try.
It was not long after my partner and I moved to England, and I was starting to get really into makeup and making youtube tutorials. And I thought to myself "I could do this".
Because we where traveling (and had the budget of travelers) I didn't really have much makeup, and less in the way of specialist makeup.
I thought about how I would do it and what I would need. And while I kept thinking about it... someone did it. I didn't want to be labeled a copy cat, so I held of for a bit.
And then the next year, a few people on youtube did one. And then after that it's safe to say that Sugar Skulls exploded in the makeup world.
I still wanted to do one (and I am still thinking of doing a series in different styles), but I wanted to do something unique, something different from what I had seen before, and something that would make an impact.
And this is it!
I was lying in bed trying to get to sleep (as I often am when all my best ideas hit me) and it just popped into my mind. I wrote it down right away just in-case I forgot it (as I often do the next day) and when I woke up it was still clear in my mind.
I had a look around, just to make sure that nobody else had done anything similar to it, couldn't find anything, so I'm pleased to say, that I think I am the first person to come up with a sugar skull design and concept like this. Yay!
I really hope that you enjoy it, and if you have giving it a try, I would love to see a photo of it. You can leave a comment to this post, or you can check out my facebook page here - if you do a style based on it on something like youtube, I would really appreciate being credited for it :)
This was the second Halloween look I did this year.
It was loosely based on an image I saw of a sculpture by Vigrinie Ropars which I fell in love with the moment I saw it.
I'm actually planning on doing a series of shots with a photographer I work with based around her works. They are pretty breath taking!
Here are the reference I used for this makeup.
To block out brows, I used a non-toxic kids glue. It washes out easily with water. Conceal with Kryolan concealer wheel Powder Kryolan Translucent powder. Mac eyeshadow #Cork Use any light coloured Matte eyeshadow Inglot #54 Mehron Metallic Powder #Gold Mehron Mixing Liquid Inglot #55 Illamasqua Precision Ink #Scribe Mac #Fix + Illamasqua pressed powder #White Mac #Harmony Any Matte Black shadow Inglot gold eyeliner Mac #Retro OCC Lip Tar #Clear
Hope you enjoyed this look. If you did, why not leave me a comment about it?
Although it's not part of our culture in New Zealand or Australia, Halloween is becoming more and more poputalr, and is fast becoming one of my favourate holidays.
What other time of the year do you get to dress up as anything you want to be?
I LOVE any chance I get to dress up, and Halloween is the best excues in the book!
So without any further ado, may I present to you, my first Halloween tutorial for 2012.
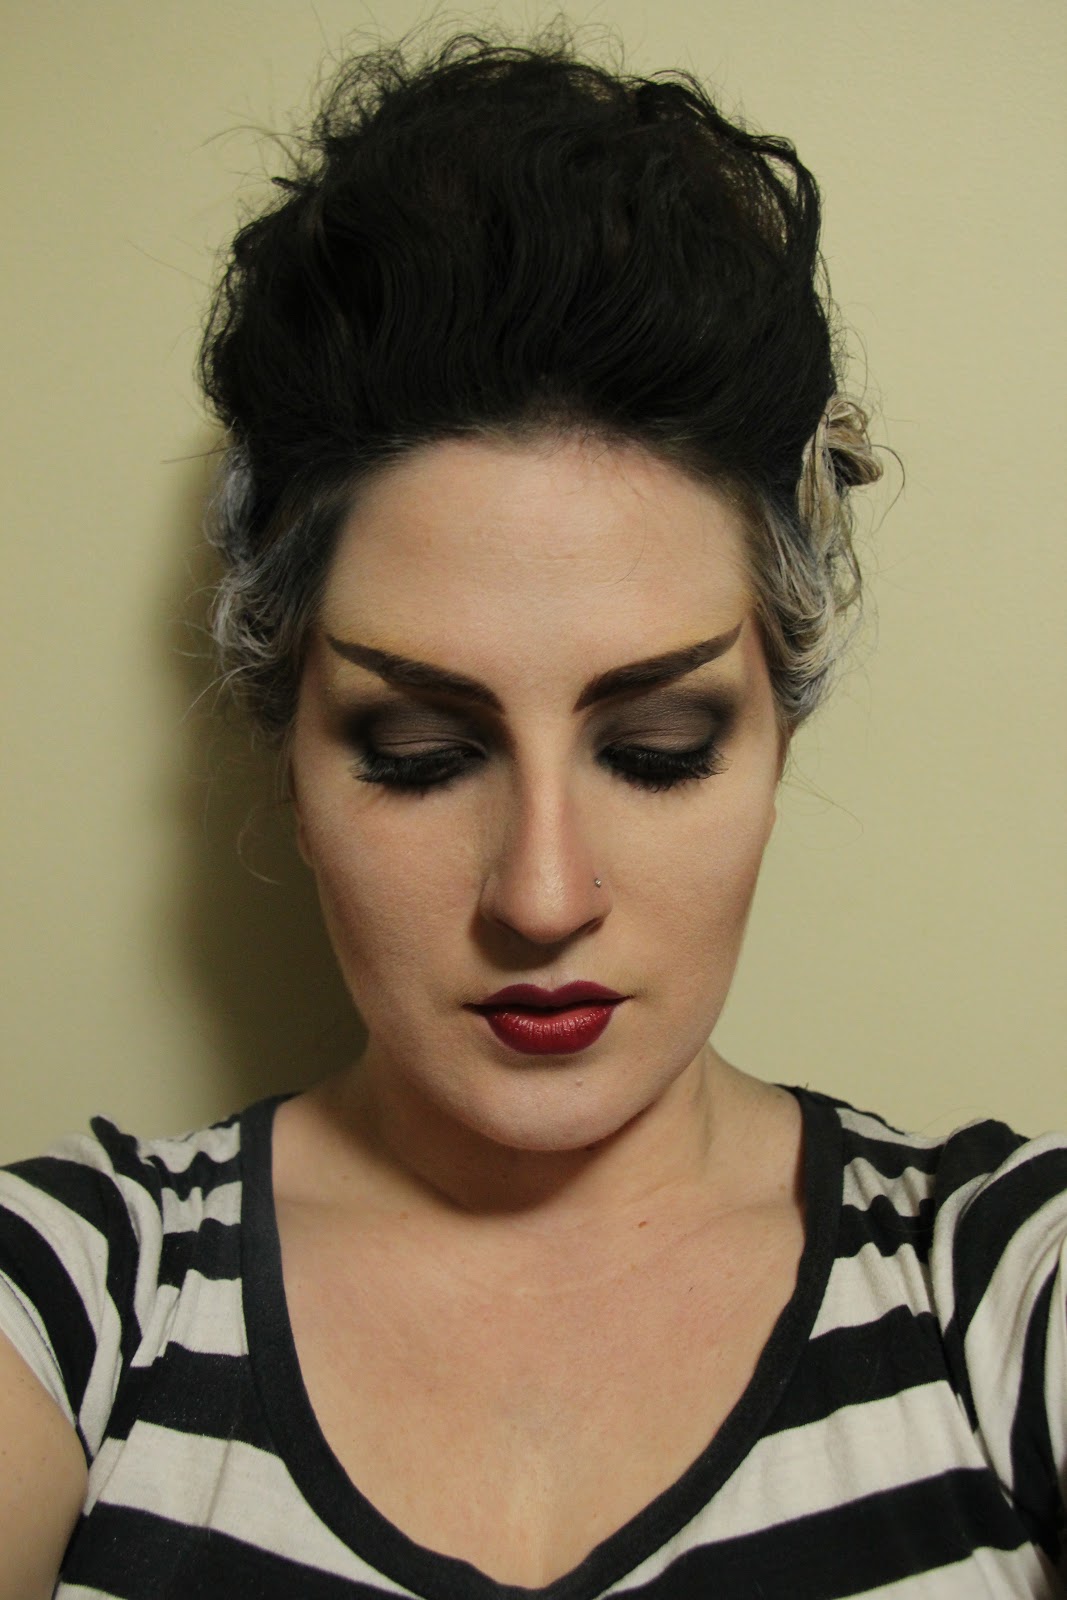
The Bride of Frankenstein!
This is Part 1 - The Hair.
Ah the hair, the hair.
I really like this style, and it's actually not too hard, although it is time consuming. Now that I have done it, I can think of a lot of way's to improve it, and I almost wish I had done a test run before I filmed it. But as I said, it is time consuming and free time, at the moment I don't have a huge amount of.
You'll need:
- A teasing comb
- Hair spray
- Some padding
- Fringe or wig pins
- Bobbie pins
- Coloured hair spray, in Black and white
- Triple barrel or curling iron
- A clean cloth, paper roll or light fabric to protect the hair
So to give you a basic break down of the hair:
Start by clurling the hair all over with a triple barrel curling tong, or a curling iron.
When I did this, I curled my hair after I had applied the padding, but you may find it easier you could do it first. Either, or - it won't effect the end product, it's just what you will find easier to do.
Section of a portion of hair at the crown of the head. Create a small ponytail with this. Thread the ponytail through a hair dounut, pulling the ends up.
Split the hair into sections (2 - 4 depending on how much hair you have in the ponytail) and pin it down to the roots to anchor the hair dounut securely in place.
In small sections, working your way in a ring around the hair, begin backcombing or teasing the hair into "hair rats".
Pin these seconds up and over top of the padding to create volume.
Repeat with another layer of hair all the way around. Pin these guys up as well.
Try to focus on creating height rather than creating heaps of volume.
For the final layer, while the hair is down, go all the way around and very lightly tease it. Don't create hair rat's like you did on the first 2 layers, just tease it slightly to spread it out and to give yourself more to play with.
Take a little more care when you pin these section up, and where possible, try to maintain the curl in the hair so that it has a bit of a wave to it, and leave it looking smooth on top.
Work out where you want your white streak to be, and leave this bit down and out of the way while you pin the rest up. If this section of hair has been teased, I would suggest combing it out so that it is tangle free. It's going to help in the next step.
When your happy with it, take your black coloured hair spray (give it a good shake!) and spray all over. Hold the can about 6 - 8 inches away from your hair so that you don't oversatureate it and end up with it looking all wet and patchy.
Remember to try and get the top and back of your hair as well. Try doing the mirror mirror thing, and take a handheld mirror to hold so that the reflection of the back of your head can be seen in the mirror in front of you, and check for any spots you may have missed.
Take a face wipe or damp cloth and wipe away and of the coloured spray you may have gotten on your skin. Particularly around the back of the neck where you can't see.
If you have light coloured hair, you shouldn't find this next bit as hard, but if you have darker coloured hair, you may struggle to get it looking white a little more. I did.
So first of all I dipped my head down, and just aimed the spray at the sections of hair I wanted white. That didn't work so well. Because my hair is a little darker, it didn't take to well and it was all wet and nasty looking, and still it was not very white, so I decided to work on plan B.
I got a clean chucks cloth, and pinned it to my head over top of the hair that I had already sprayed black so that it was well protected.
Then I pined up the section I wanted to spray white. (See the video and it will make a bit more sense)
I was a little optimistic about this, and wanted to try and keep the wave that I had put into my hair with the triple barrel tongs.
Don't even bother with that.
Instead comb out the hair so that it is smooth and as tangle free as you can get it.
Pin it up over top of the cloth that you have pinned over the black hair, and start spraying.
I started off working in light coats trying to build up the colour and keep it dry as I did with the black, but it didn't really work.
I ended up going through a whole can on the two sections and the hair was pretty wet afterwards and didn't hold any of it's shape. Because it's hair spray it's also pretty sticky.
So unpin it and go back in with a comb (I would suggest a wide toothed comb) in an upwards direction, try to comb it so that the hair is sitting smooth and neat.
Get it as smooth as you can, and try to keep the fly-away's contained.
Now start working it up in small "C" Sections or waves. Each time you get to the bend in one curl, pin it down with a fringe pin, and then turn in the other direction, pin and repeat.
With any luck, it should look something like this (only neater because you combed the section out so that it was nice and smooth before you started pinning in the waves):
Once it is dry, it should be pretty set and you should be able
to take the pins out without it loosing the shape, but if you are worried
about it, you could leave it in. If I was going to go out - particularly
if I was to go dancing - I would probably leave the pins in.
Hopefully, some of you would have heard about, or read about the Illamasqua Fight For A Fair Beauty Price in Australia campaign and if you have, I really hope that you could sign your name to it and supported it. Here's a link. It's easy, just click it and fill it out and you're done! http://www.illamasqua.com/fairpriceforbeauty/
Companies in Australia and New Zealand - being so isolated - Can pretty much charge what they want too. With little competition and nothing to drive the prices down, people keep buying because they have no choice.
Take a stand and go without it - or give in and buy it because you need it (or, let's be honest because it's shiny and you really really want it. I like shiny things...)
This is all across the board in many different areas, from computer software and electronics, to clothes to makeup - it's a pretty common factor in pricing for most things over here.
England - being surrounded by, and so close to so many different country's as well as having such a huge population - while it is an expensive place to live, in many aspects it is a lot cheaper.
Makeup for example is much cheaper.
America is huge. There's so many different companies selling the same thing, they drop their prices down because if they didn't, people would just go else where.
For Australia and New Zealand, unfortunately it's a different story.
Things have always been more expensive here, but when the US dollar was strong and the Australian dollar was weak, it almost balanced out. Products where twice the price over here, but that's because the dollar in America was twice as strong, so once you converted it, add on a little for shipping to get it over here, it pretty much balance out.
Then the global financial crisis hit. The British Pound and the US Dollar dropped, while the Australian Dollar crept up a little higher.
Now $AUD and $US are pretty much on par and at some stages the Australian Dollar is actually higher!
But have prices come down to reflect this? No.
Why would they?
What company would drop their prices to reflect what the product is actually worth, when people are still buying it at the current price? Where else are they going to get it from?
MAC cosmetics in America does not ship to Australia (or anywhere outside the US), so unless you go over to buy it, you really have no choice but to buy it here. Believe me, I've tried. There are some things, that unless you have a relative or friend that can sent it over to you, or you go over yourself to get it - you simply can't get from "A" to "B". "A" being America, "B" being the Backwater Island (although a large one) that is Australia.
There are some companies that charge a reasonable rate for cosmetics over here, and there are a lot that don't. Inglot Cosmetics is one of the best. Their eye shadows are $10 per shadow in the freedom system, while a MAC refill for a pro palette is $26 and an normal eyeshadow is $33. Compared with $15 for the same thing in the States. More than twice the price!
You may have heard of Sleek Makeup before, it's a brand that has taken off in the past 3 years. Originally "discovered" by Sam and Nic of Pixiwoo, it has become hugely popular as a good quality but affordable product for makeup enthusiasts. When it first came out while I was living in England, the best thing about it was that a palette was under £5.
That works out to $7.80AUD (converted right now at this very moment.)
But I recently saw it on the Makeup and Glow (cosmetics and tools company aimed at professionals in Australia) website for $19.
Again more than twice the price.
A few days ago I looked into getting some Skindinavia makeup setting spray to try out.
Every website that I looked at in Australia had it listed at the same price.
$29 for the 2oz bottle
$49 for the 4 oz bottle.
Getting a little bit frustrated I decided to look on the actual Skindinavia website and thought I'd order it directly from there.
Here are the prices I found for the Orignal Skindinavia formula.
2oz = $19
4oz = $29
8oz = $39
Awesome. Wonderful! A done deal.
I went to register to buy some. Filled out my details, went to select my country... and couldn't find Australia.
Every other country is listed, from Afghanistan to Zimbabwe - including New Zealand
Every country. Except Australia.
So I clicked on the link and hopped over to the Skindinavia Australia website and had a little looksee.
Here's what we are lucky enough to be able to get.
20ml (0.67oz) = $14 <--- this by the way, comes free with any purchase from the US website.
59ml (1.99oz) = $29
118ml (3.99oz) = $49
The 8oz (236ml) is not even available to us, and if it is, I'm sure that it would cost a small fortune.
I've seen comments and reviews on blogs and youtube and the likes from people in America "It was good, but it was pretty expensive" and "I liked it, but $29 for 4oz? Yikes, that's pretty steep" or "Great, but 2 eye shadows for $20 is a lot" that type of thing. Can you guys even imagine having to pay $33 for one eyeshadow? Or $49 for 4oz of a setting spray? It's insane.
Que Illamasqua's Fight For a Fair Beauty Price Australia.
At least someone out there is trying to help improve the situation, by promoting and encouraging a fair price for cosmetics in Australia.
While I believe the petition is still active and growing, Illamasqua recently held up their end of the bargain and lowered their prices by 40% which is pretty huge.
It will be interesting to see if any other cosmetic company's in Australia follow suit. I for one certainly hope that they do, and show respect for their customers, be them professional artist's or passionate makeup enthusiast - and lower their prices to reflect what the product is actually worth.
In the mean time, Well Done Illamasqua. Your fight for a fair beauty price is greatly appreciated, and we salute you!
Here's look two (well, actually look one in order of filming, but look two in order of uploading) in my Game of Thrones series, this look is based on the men of the wall, the crow's, the night's watch. Protecter's of the realm, the sword in the darkness.
I really like this look. I do love a smokey eye, and I love glitter. A silver/black smokey eye, with glitter totally rock's my world ;)
I'm dying to see what happens next in the Song of Fire and Ice series with the men of the wall. Their numbers are dwindling. The Lord Commander has taken all of the remaining forces out beyond the wall in hopes of solving a few mysteries and finding out exactly what's been happening out there. But what will happen on the wall and on our side? Questions, questions! Better keep on reading I guess...
In keeping with the face that the men are all surrounded by snow and ice all year round, in summer and in winter, I am going to go right ahead and presume they will have mostly pale skin. While that's not necessarily the way it works, and often you can get more sunburn when out on snow than you can on a sunny day, (because the light and UV ray's reflect back up off the snow and you get hit with it twice) All of the men on the wall in the TV series tended to have pale skin, and it represent's the snow to me, so that's why I did the base this way. If you wanted to add more colour on the cheeks or cheekbone's you of course could.
Here's a look at the video
And Here's what I used:
Too Faced, Shadow Insurance
Mac #Blacktrack Fluid liner
Inglot #454
Inglot #23
Inglot #65
Inglot #30
Inglot #35
Inglot #101R
Urban Decay, 24/7 Glide On #Zero
Inglot #107R for brows
Eye Kandy - Liquid Sugar
Inglot glitter #73
The Body Needs2 - Holo Black
Illamasqua Liquid Metal #Phenomina
Revlon Colour Stay, Liquid Liner
Mascara
Graftobian cream blush, #Peach Blush, Vienna Rose
Mac Mineralised Skin Finish Natural - #Light
NYX #Natural
Illamasqua #Electrify
Inglot AMC Multicolour System Highlighting Powder #83
False Lashes
Helloween is just around the corner and it's time to start thinking of wounderful ideas!
Some tutorials I have coming up include:
Bride of Frankinstine makeup
Bride of Frankinstine hair
Pin Up Zombie girl
Pop Art Boy
Sugar Skull (-yes I know its been done before, but i love them so much I just have to do one.)
Marie Antoinette - dead
Terminator - revamped (- this may wait until next year...)
Drowned Victom
And a few others I'll leave as a suprise ;)
Please excuse this blog. I'm writting away on my phone. Spelling and gramour is bound to be off.
More than normal.
This is the first in a series (well actually if I'm being perfectly honest, it's the second. The first was filmed around 2 months ago, but I haven't edited it or up loaded it yet) in a new series that I decided to do. I've been thinking about it for a while, but I've been so busy working on film and other projects that I haven't actually got very far yet. But here we go!
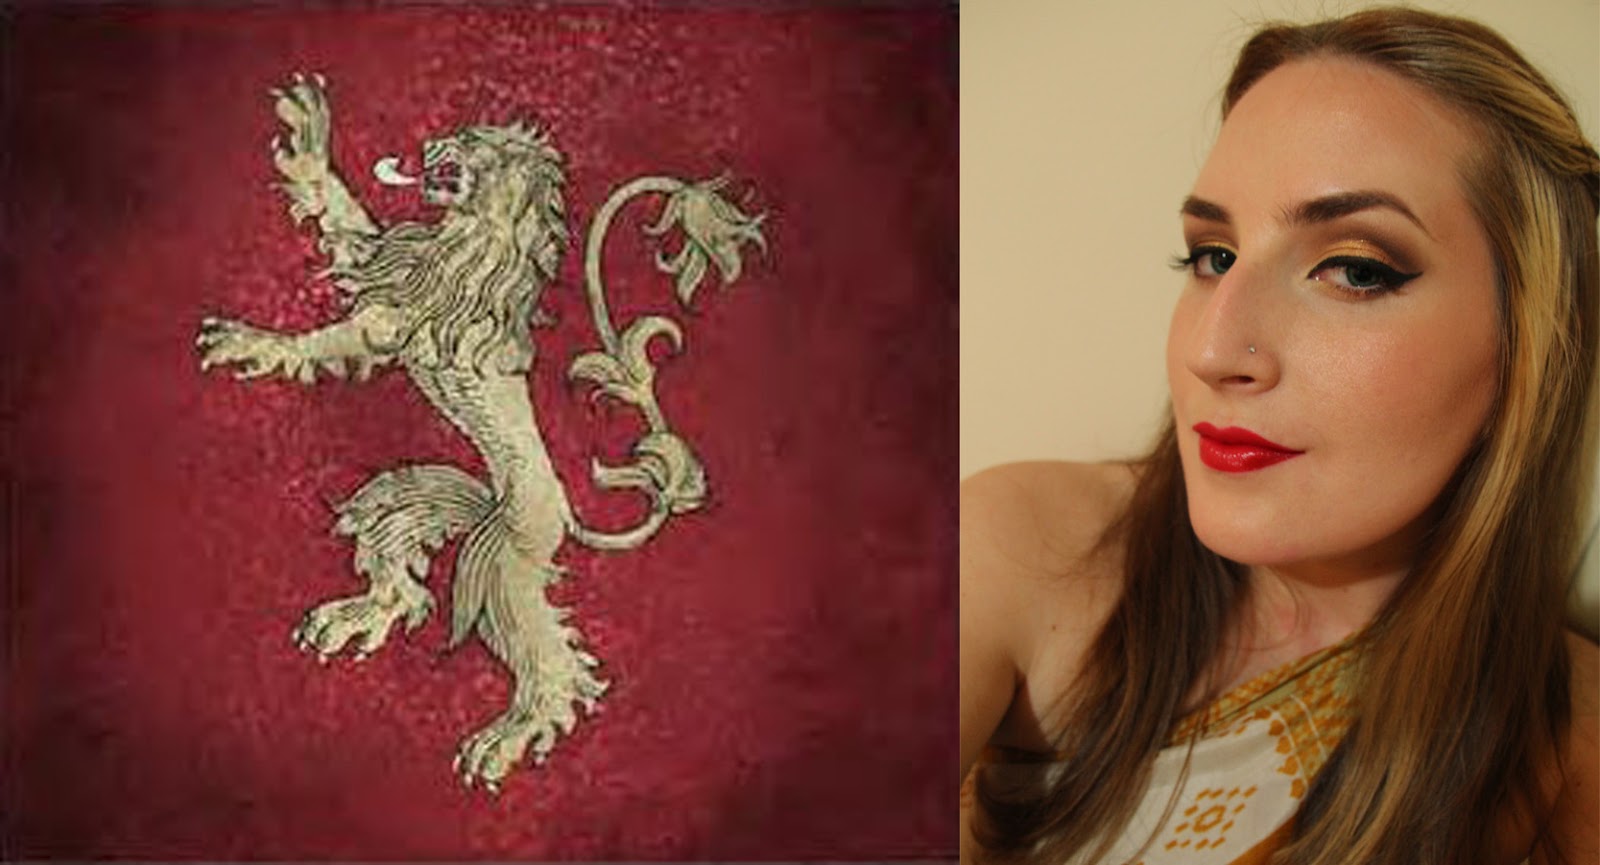
This is a look inspired by House Lannister from the Song of Fire and Ice Game of Thrones series. If you haven't read the book or watched the TV series, I highly recommend it. It's a bit grim in places, but well worth it. Fantastic storey line. The books are beautifully written and it is so easy to pick it up and start reading and not realise that a few hours have gone past. The TV series is brilliant. I can't even imagen the budget they must have for that show.
The set's, the costumes, the wigs - everything about it is so beautifully put together and done that it's so easy to get lost in the world they have so stunningly created.
The Lannister colours are Red and Gold, and they are associated with all things opulent, rich and powerful. While the family motto is "Hear me Roar" it is more comment to hear "A Lannister always pays his depts". And indeed they do. Whatever you maybe rewarded for helping a Lannister, you can expect double if you betray them.
Powerful and rich and filled to the brim with cunning, if you get on the wrong side of a Lannister, no expense will be speared in making sure they pay you back for it.
I don't want to give anything away for those who haven't read the book or see the show, so I wo't say anything more about it, but please enjoy the look.
In keeping with the rich and opulant nature of the Lannister's I used all golds and bronzes on the eye, keeping the lip red. I did use a lot of different colours for this look, but you don't have to use every single product I used. Skiping out one or two of the bronze colours won't have a huge impact on the look.
Please check out the youtube video here:
Enjoy!
Products used: Too Faced Shadow Insurance
Inglot #355 Inglot #30 Inglot #27 Inglot #430 Inglot #606 Inglot #605 Inglot #607 Inglot #55 Inglot #107R Inglot #329 and #363 Inglot #189 - loose pigment Revlon Colour Stay Liquid Linder Mascara Inglot AMC #66 - Face and Body Illuminator Mac Minteralized Skin Finish Natural - Medium Plus Inglot 107R in brows with an angle brush Inglot #27 Blush Illamasqua Powdered Metal #Thalia Illamasqua Bronzing Duo #Glint and Writhe (dark colour) White liner on water line Illamasqua #Torment lip liner Inglot #63 Lip colour